
 繁體中文
繁體中文Support – Admin Console (iOS)
ESP 2.0 Setup
ESP Complete Setup tutorials for users easier to handle the whole process.
Full Setup (iOS - Admin)
- On your iPads, remove MDM Certificate
- On your iPads, go to Settings > General > Transfer or Reset iPad > Erase All Content and Settings
- Register ESP as Your MDM Server
- Set up DEP
- Set up VPP
- Set up APNS
- Set up Wi-Fi and Blueprint
- Reset and Activate ESP on devices (iPad)
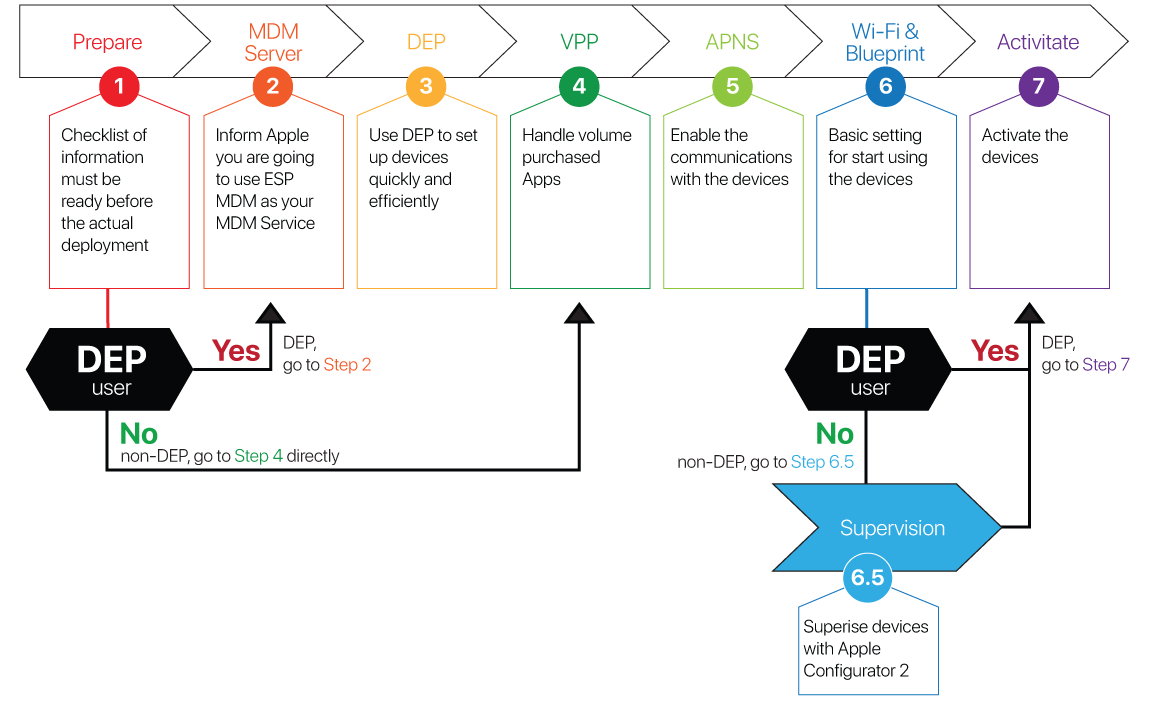
- For normal setup with DEP, you will need to go through Steps 1 to 7 ( 1 > 2 > 3 > 4 > 5 > 6 > 7 )
- If you do not have DEP, you will have to skip Steps 2 and 3 and take Step 6.5 ( 1 > 4 > 5 > 6.5 > 7 )
- Please consult your Apple Authorized Reseller for setting up your Apple School Manager (ASM), DEP or VPP
ESP Full Setup for iOS

Please get the following information ready prior to the actual deployment of your devices:
- Create ESP Account – please take less than 1 minute to register http://www.eschoolpad.com/enroll/
- Apple School Manager Account
- The PO number or iPad SN csv list from your Apple authorized reseller
- Notify your Apple authorized reseller your 6 digits DEP customer ID and tell them you are going to use eSchoolPad
- School owned Apple ID for APNS certificate creation
- Apple DEP and VPP account and password with registered mobile phone in place if applicable
- If you choose for non-DEP setup, you will need to install the latest Apple Configurator on a Mac with the latest MacOS installed.
- Minimum OS: iOS 9.3 or above (Ready to be wipe again)
- PC/Mac browser with internet connectivity
- School Wi-Fi SSID and password
- Apps to be deployed onto the devices, including both VPP or non-VPP apps.
- Devices naming arrangement (e.g. iPad0001, iPad0002,…)
- App grouping (eg. subjects) and device grouping (eg. classes) for later App Labelling and Device Labelling
- Restriction (e.g. disable app store, camera etc…) for every iPads
- Prepare a csv file with iPad Serial Numbers, iPad name and grouping
- Define home screen layout (eg. app folders) arrangement
- For non-DEP setup, you need:
- Latest Apple Configurator on a Mac with the latest MacOS installed
- USB cable for connecting iPads to Mac
- School owned Apple ID for each iPads
- iPad 2 or above
- On iPads, Settings > iCloud > Turn OFF “Find My iPad”
Something more you may need to consider:
-
- Wi-Fi Network: If you have a lot of devices to set up, we recommend you set up a Wi-Fi network with no password authentication for giving each iPad Wi-Fi and Internet connection quickly.
- Caching: If you have a lot of apps to install, we recommend you install OSX Server and enable Cache server service.
All set? If yes, you can now proceed to register MDM Server
-
- Most importantly, do not open your iPads/MAC until you are told to do so
- Please follow the instructions accordingly until you read COMPLETE!!!! in the last stage
- Please go to “Step 2 – Register ESP as Your MDM Server”
- For non-DEP setup, please go directly to “Step 4 – Setup VPP”

**For non-DEP, please skip this and go to “Step 4 – Setup VPP” directly
- Download ESP Public Key here
- Register ESP as your MDM Server in ASM
- Login to http://school.apple.com
- Select Click on Login User’s name and select “Preference”
- Tab + in Your MDM Servers
- Type ESP MDM as the Name of the Server
- Upload ESP Public Key (Downloaded in Step 1 above) in Upload file
- Tap Save
- (on the top of the MDM server) please tap Download Token *This is essential for later setup
- The MDM Server is setup successfully
- Done!!! You can now proceed to “Step 3 – Setup DEP”

After registering ESP MDM as your MDM Server, you will need to setup your DEP in ESP Admin Console.
**For non-DEP, please skip this and go to “Step 4 – Setup VPP” directly.
Please proceed the following step by step:
- Setup in ESP Admin Console
- Login ESP Admin Console ( https://www.eschoolpad.net/admin)
- Select iPad / Mac platform, tap Apple > DEP > DEP Setup
- Upload the Server Token which was downloaded previous step (e.g. *_smime.p7m)
- Configure options, tap SAVE to keep the settings.
- Go to Apple > DEP > DEP Device
- All devices’ Profile Status will change from empty to assigned and Profile UUID will appear
- Once the profile is pushed to the devices, the Profile Status will change to pushed
Profile Status Meaning empty no profile has been assigned yet assigned device has been assigned DEP profile but not yet configuredpushed device has been DEP configured
- Assign Devices in ASM
- Select Devices
- Choose devices by:
- Assign the devices you want to manage in MDM server, by entering the device’s ⦿ Serial Number / ⦿ Order Number / ⦿ CSV File
- Choose Edit MDM Server: Select ESP MDM
- Tap OK to confirm
- Done!!! You can now proceed to “Step 4 – Setup VPP”

After the DEP is ready or you are non-DEP, you need to set up VPP for your APPs.
- Download VPP Token from ASM
- Login to Apple School Manager ( https://school.apple.com )
- Click on Login User’s name and select [Preference] > Select Payment and billing > (select App)
- Find [Server Tokens] > Click [Download] > Token will download to your computer
- Setup VPP
- Login to ESP Admin Console ( https://www.eschoolpad.net/admin )
- Go to Apple > VPP > VPP Setup
- In Upload Token field, upload the VPP Token you have downloaded in Step 1 above
- Tap Submit button
- VPP account has been setup successfully
- Update Apps
- Scroll up and tap Update VPP Apps button.
- WAIT until the VPP Sync process is completed.
- Done!!! You can now proceed to “Step 5 – Setup APNS”

Apple Push Notification Service certificate is essential to push notification to the MDM devices.
Please follow step by step to proceed:
- Download the Certificate Signing Request (CSR) file from ESP DOWNLOAD NOW – avrio_mdm.csr
- Apple Push Certificates Portal
- Login to ( https://identity.apple.com/pushcert ) with your Apple ID
- Click Create a Certificate
- Accept the Terms of Use
- Leave Notes empty
- Choose File upload the Certificate Signing Request (CSR) – “avrio_mdm.csr” you have already downloaded
- Click Upload
- Now you have successfully created a new Apple Push Certificate
- Click Download the certificate – MDM_Arche Solutions Company Limited_Certificate.pem
- Update Certificate at ESP Admin Console
- Login to ESP Admin Console
- Go to Apple
- Provide Apple ID
- Upload Push Certificate by selecting the certificate you have just downloaded in Step 2 above
- Tap Save button to proceed
- Check and make sure the “Apple ID” and “Valid Date” are correct
- Done!!! You are now closed to the final setup. Please go to “Step 6 – Setup Wi-Fi and Blueprint”

- Create Wi-Fi Profile
- Login to ESP Admin Console ( https://https://www.eschoolpad.net/admin/v5/login.php)
- Go to Profile
- Tap + Create New
- Type School Wi-Fi in Profile Name field
- Tap + New Configuration
- Select Wi-Fi from the dropdown
- Provide SSID and Password
- Tap Save
- Setup Blueprint
- Go to Settings > Blueprint
- There is a default blueprint in the list, naming Device Enrolment Blueprint
- Make sure the Status is ON
- To edit the setting, tab ⋯ Action button in the far left column.
- Tap Edit
- The default settings including:
- Install All Apps ( Free Apps in ESP Library )
- Set Homescreen Layout ( ESP Default )
- Set Wallpaper ( Lock Screen, Home Screen & Show Device Name )
- Profiles ( Default ON )
- Disable App Install/AppStore/Remove
- Disable Game Center
- Disable Facetime
- Disallow Change Device Name
- Disable Enterprise Apps
- Disable iMessage
- Disable Apple Music
- In Profile, scroll down and find your School Wi-Fi created in Step 1 above.
- Check ☑︎ School Wi-Fi and make sure status is Install
- Tap Save at the bottom to confirm the settings
- DONE!!! You are almost there. Now you can touch your devices. Please go to “Step 7 – Activate Device”

For non-DEP users, you must go through this “Step 6b – Supervision” before moving forward
Please follow step by step:
- Find Enrolment URL in ESP Admin Console
- Login ESP Admin Console(https://www.eschoolpad.net/admin/v5/login.php)
- Go to Settings > School Info
- Find Apple Configurator 2
- Note the URL like https://www.eschoolpad.net/…………… for later use below
- Setup an MDM Server
- Open Apple Configurator 2 on your Mac Machine
- Choose the devices > Click Prepare
- Choose configuration by Manual > Click Next
- Choose Add New Server > Click Next
- Enter the Name ESP MDM and Enrolment URL your have noted in Step 1d above
- Select eschoolpad.net as anchor certificate > Click Next
- Supervise Devices
- Check Supervise Devices
- Check Allow devices to pair with other computers
- Click Next
- Organizaton Info
- Enter School Name and other informations
- Press Next to confirm
- Choose ⦿ Generate a new supervision identity > Click Next
- Configure iOS Setup Assistant
- Choose the steps will be presented to the user in Setup Assistant
- Click Prepare to finish all the prepare iOS Device process
- This step may take a while, please wait for the process to finish
- Done!!! You can now proceed to “Step 7 – Devices activation”

You are doing very well up this point. Now you can touch your devices to finalize the setup
- Take out all the devices you have registered in DEP
- Make sure the devices are connected to the Internet
- If the devices are brand new, once the devices are connected to the Internet, the deployment starts automatically
- If the devices have been initiated and you are on the homescreen, tap Settings > General > Transfer or Reset iPad > Erase All Content and Settings. Tap Continue then Erase iPad
- WAIT until the deployment completes. Please note that it may take some time, the process will take longer if you have a lot of devices to be deployed and apps to be pushed onto the devices. Certainly, the bandwidth of your internet connectivity is a major factor as well
- Verification: you can go to ESP Admin Console to check if the devices have been added into your Device Management list. Go to Device > Device Management
- On your devices, tap ESP icon

- If prompt for Location Services, please choose Always Allow
- If prompt for Notification, please choose Always Allow
- COMPLETE!!!